Rubbing Alcohol Method for Lice Brush Sterilization
Dealing with head lice can be stressful for families. However, proper cleaning of hair care tools is essential to prevent reinfestation. The experts at Top Hair Dressers recommend thorough sterilization methods to keep your brushes safe and lice-free. This guide focuses on using rubbing alcohol as an effective solution for eliminating lice and their eggs from your hair brushes.
Understanding the Importance of Brush Sterilization
Head lice spread easily through direct contact with contaminated items. Brushes and combs are common culprits in reinfestation. Therefore, learning how to clean hair brush from lice becomes crucial during treatment. Additionally, proper sterilization protects other family members from exposure. Lice can survive on brushes for up to 48 hours without a human host.
Many people underestimate the importance of cleaning hair tools. Consequently, they continue using contaminated brushes after treatment. This mistake leads to repeated infestations and frustration. Rubbing alcohol offers a simple yet powerful solution to this problem.
Why Rubbing Alcohol Works Against Lice
Rubbing alcohol, also known as isopropyl alcohol, is highly effective against lice. The solution works by dissolving the protective waxy coating on lice and their eggs. This process dehydrates the parasites quickly. Moreover, alcohol penetrates the egg casings, killing nits before they hatch.
The recommended concentration is 70% to 91% isopropyl alcohol. Higher concentrations evaporate too quickly to be effective. Meanwhile, lower concentrations lack sufficient strength to eliminate all lice. According to the Centers for Disease Control and Prevention, proper disinfection of personal items is a key step in managing head lice infestations.
Materials Needed for the Rubbing Alcohol Method
Gathering the right supplies makes the process easier. You will need the following items:
- Rubbing alcohol (70% to 91% concentration)
- A container large enough to submerge your brush
- Disposable gloves
- A fine-toothed comb or old toothbrush
- Paper towels
- A clean, dry towel
Having everything ready beforehand saves time. Additionally, it ensures you complete the sterilization process correctly.
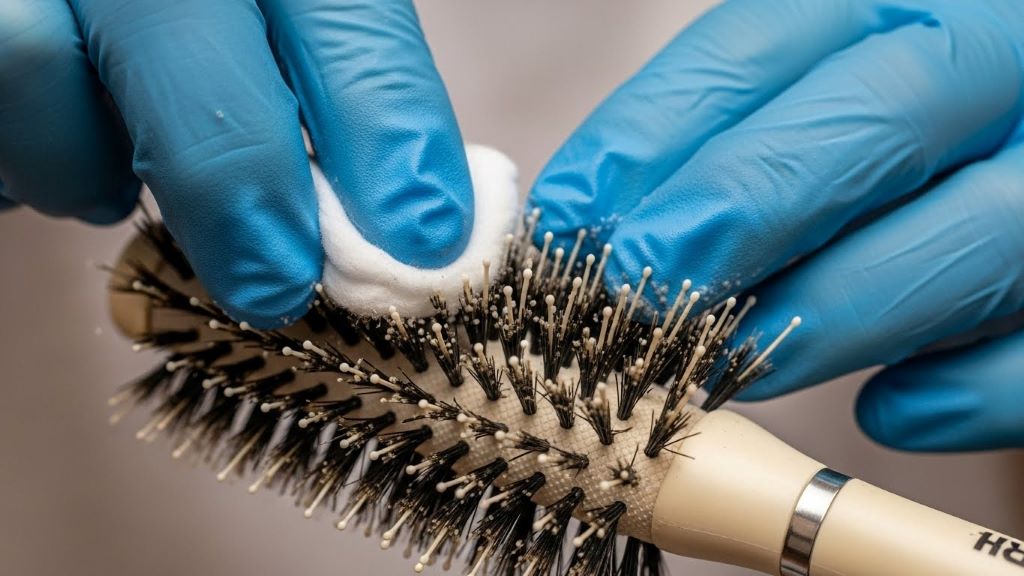
Step-by-Step Guide to Cleaning Your Hair Brush
The rubbing alcohol method follows a simple process. First, remove all hair from the brush. Use a comb or your fingers to pull out tangled strands. This step is important because hair can harbor lice and nits.
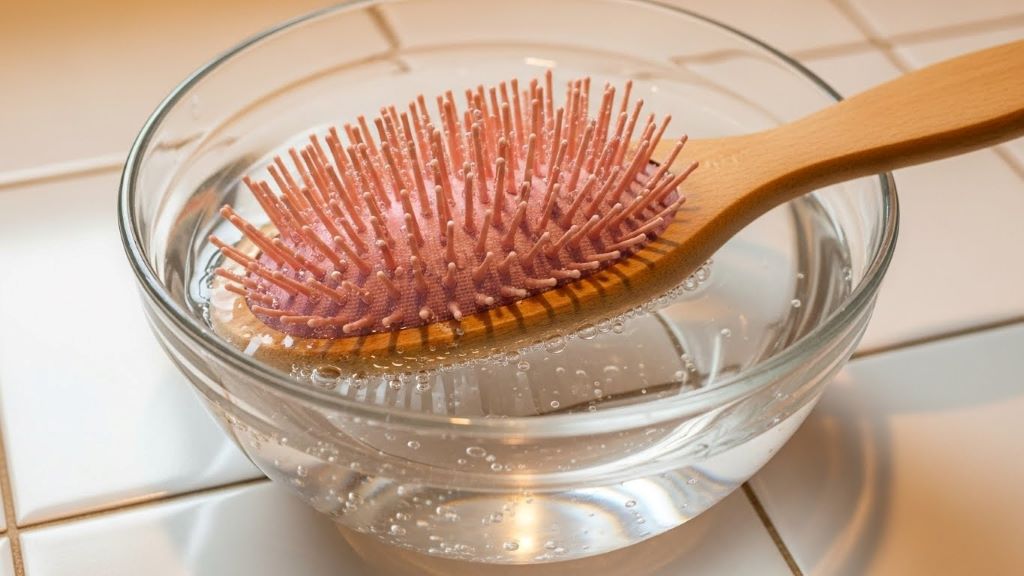
Next, put on disposable gloves to protect your hands. Pour enough rubbing alcohol into your container to completely submerge the brush. The brush should be fully covered for maximum effectiveness.
Then, place the brush in the alcohol solution. Make sure all bristles are soaking. Leave the brush submerged for at least 30 minutes. However, soaking for one hour provides better results. The extended time ensures all lice and eggs are eliminated.
After soaking, remove the brush from the solution. Use an old toothbrush to scrub between the bristles. This action removes dead lice and dissolved nits. Pay special attention to the base where bristles connect to the brush.
Finally, rinse the brush under warm running water. Shake off excess water and place the brush on a clean towel. Allow it to air dry completely before using again. The alcohol evaporates quickly, leaving your brush sanitized.
Additional Cleaning Methods to Consider
While rubbing alcohol is highly effective, combining methods provides extra protection. Therefore, consider these supplementary approaches. Boiling water offers another powerful sterilization option. Simply submerge metal or heat-resistant brushes in boiling water for 10 minutes.
Freezing is an alternative method for delicate brushes. Place the brush in a sealed plastic bag and freeze for 48 hours. The extreme cold kills lice and nits. However, this method takes longer than alcohol treatment.
Medicated lice shampoo can also clean brushes. Soak the brush in a solution of shampoo and warm water for 30 minutes. This approach works well for wooden brushes that might be damaged by alcohol.
How Often Should You Sterilize Brushes During Treatment
Frequency matters when dealing with lice infestations. During active treatment, clean brushes daily. This practice prevents reinfestation from surviving lice. Continue daily cleaning for at least two weeks after the last lice sighting.
Once the infestation is cleared, maintain a weekly cleaning schedule. Regular maintenance prevents future problems. Additionally, teach family members not to share brushes. This habit reduces transmission risk significantly.
Safety Precautions When Using Rubbing Alcohol
Rubbing alcohol is flammable and requires careful handling. Always work in a well-ventilated area. Open windows or turn on fans to disperse fumes. Never use alcohol near open flames or heat sources.
Keep alcohol solutions away from children and pets. Store the container in a secure location. Additionally, avoid contact with eyes and skin. If accidental contact occurs, rinse immediately with water.
Dispose of used alcohol properly. Pour it down the drain with plenty of water. Never reuse alcohol that has been used for lice treatment. The solution may contain live lice or eggs.
Cleaning Different Types of Hair Brushes
Different brush materials require specific care. Plastic brushes tolerate rubbing alcohol well. They can withstand prolonged soaking without damage. Metal brushes are also alcohol-safe and dry quickly.
Wooden brushes need special attention. Excessive alcohol exposure can damage the wood. Therefore, limit soaking time to 15 minutes for wooden handles. Alternatively, use the freezing method for these brushes.
Natural bristle brushes made from boar hair are delicate. These brushes benefit from shorter soaking times. Consider using diluted alcohol solutions for natural materials. Mix equal parts alcohol and water for gentler cleaning.
Signs Your Brush Is Properly Sterilized
Knowing when your brush is clean provides peace of mind. A properly sterilized brush appears free of debris. No visible lice, nits, or hair should remain in the bristles.
The brush should smell faintly of alcohol initially. This odor dissipates as the brush dries. Additionally, the bristles should feel clean and smooth to the touch.
Inspect the base carefully where bristles attach. This area often harbors hidden eggs. Use good lighting to check thoroughly. If you spot any remaining nits, repeat the cleaning process.
Preventing Future Lice Infestations
Prevention starts with education and good habits. Teach children to avoid head-to-head contact during play. Discourage sharing hats, hair accessories, and brushes at school.
Store personal hair care items separately from others. Use individual bags or containers for each family member. This organization prevents accidental sharing.
Regular head checks help catch infestations early. Examine your child’s scalp weekly, especially during school months. Look behind the ears and at the nape of the neck. These warm areas attract lice.
Maintain clean bedding and clothing. Wash items in hot water and dry on high heat. This practice kills any stray lice that may have transferred to fabrics.
When to Replace Your Hair Brush
Sometimes replacement is more practical than repeated cleaning. Consider buying a new brush if yours is heavily infested. Old brushes with damaged bristles are difficult to clean thoroughly.
Budget-friendly brushes make replacement economical during treatment. Having multiple brushes allows rotation during the cleaning process. Therefore, you always have a clean brush available.
Replace brushes every few months regardless of lice issues. Worn bristles lose effectiveness and can damage hair. Regular replacement maintains both hygiene and hair health.
Conclusion
The rubbing alcohol method provides an effective, affordable solution for lice brush sterilization. This simple technique eliminates lice and nits from hair care tools quickly. By following the proper steps, you protect your family from reinfestation. Remember to clean brushes daily during treatment and weekly for maintenance. Additionally, combine this method with other preventive measures for best results. Proper brush sterilization is a small effort that makes a significant difference in managing head lice. Stay vigilant, maintain good hygiene practices, and your family will remain lice-free.
Frequently Asked Questions
How long does rubbing alcohol take to kill lice on a brush?
Rubbing alcohol kills lice within minutes of contact. However, soaking your brush for 30 to 60 minutes ensures complete elimination of both adult lice and their eggs. This extended time allows the alcohol to penetrate all areas of the brush and dissolve nit casings effectively.
Can I use vodka or other alcoholic beverages instead of rubbing alcohol?
Regular alcoholic beverages like vodka are not recommended. They lack sufficient alcohol concentration to kill lice effectively. Rubbing alcohol contains 70% to 91% isopropyl alcohol, while vodka typically has only 40% ethanol. Therefore, stick with proper rubbing alcohol for reliable results.
Is it safe to use rubbing alcohol on brushes for children?
Yes, rubbing alcohol is safe for cleaning children’s brushes when used correctly. Ensure the brush is completely dry before use, as the alcohol evaporates fully. Additionally, handle the cleaning process yourself rather than allowing children to use alcohol directly.
How do I clean a lice comb after checking for lice?
Clean lice combs immediately after each use. Wipe the comb with a tissue to remove visible lice and nits. Then soak it in rubbing alcohol for 30 minutes. Alternatively, rinse the comb under very hot water between strokes during checking sessions.
Will rubbing alcohol damage my expensive hair brush?
Rubbing alcohol is generally safe for most brush materials. However, wooden handles may experience slight drying with repeated exposure. Limit soaking time to 15 minutes for wooden brushes and apply wood conditioner afterward. Plastic and metal brushes tolerate alcohol well without damage.
Related Topics:
Treats Without the Tricks: Healthy Halloween Party Food Your Guests Will Love