How to install an electric water heater?
Choosing the most suitable device for the production of DHW (Sanitary Hot Water) is never easy. Among all the options, electric water heaters have many advantages, such as ease of installation. Are you considering installing one of these devices on your own? We are going to tell you how to install an electric water heater in 5 simple steps.
How to install an electric water heater in 5 steps
To enjoy hot water, it is necessary to have a proper installation. In this sense, although installing an electric water heater is indeed easier than installing other types of devices (such as a gas heater), it is not without a certain complication.
- Requires some plumbing and electrical experience.
Also keep in mind that until the installation is completed, we may not be able to have hot water. And although a professional can install the thermos in a few hours, if we do not have experience in this type of task, it could take several days to have everything finished.
We cannot lose sight of the fact that we will need a series of specific materials and tools to carry out the installation successfully. In other words, we will have to add this other investment to the investment in the device, if we do not have these elements.
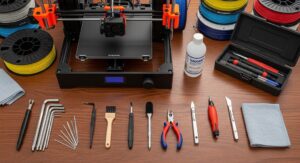
Materials and tools
Drill – Spanner – Level – Termo – Electrolytic Coupling – Safety valve – Latiguillos reinforced – Thermostatic mixer – Pressure reducer – Screws and plugs – tape or Teflon thread.
For all this, it is quite common to request professional help to install an electric water heater. Even so, if you have already decided to carry out the project without help, you can follow the instructions below.
1. Choose the most suitable place
Choose the most suitable place according to the regulations. In this case, it might be interesting to consult the Electrotechnical Regulations for low voltage.
Remember that it is recommended that the place has a grounded plug and that it is close to the water connection.
Before starting, you must close the water stopcocks that connect to the place you have chosen or, if you do not have segmented stopcocks, close the general stopcock.
2. Hang the thermos
Hang the thermos on the wall. If the surface is very thin, it may need to be reinforced in some way. Keep in mind that it not only has to support the weight of the device itself but also of all the liters of water for which it has capacity.
To hang the thermos, the following steps are usually followed:
Mark on the wall the exact point where you want to place it. You can measure the width of the anchor pins of the thermos and transfer these measurements to the surface on which it will be installed. Check with the level that the marks are straight and aligned.
Drill in the marked points and place the dowels and the screws.
Use suitable cleats to support the weight. We have already pointed out that the weight of the thermos filled with water must be taken into account.
It may take the collaboration of two people to hang the item since it is an element that usually weighs a lot. Once placed, fix it to the wall.
3. Connect the water
The next step is key and essential to be able to enjoy our electric water heater: you have to connect the water:
Screw the electrolytic sleeves onto the cold water inlet tube and the hot water outlet tube. These items help to prevent corrosion.
Also screw the safety valve into the cold water inlet, to protect it from excess pressure.
Wrap Teflon tape or thread around the threads to ensure the tightness of the installation.
Screw the hoses, which should be reinforced, to the safety valve in cold water and, in hot water, to the thread of the hose.
You can also install a tube that leads to a drainpipe so that you can easily empty the tank when needed. A water cut-off cock can be placed between the hose and the supply tube.
4. Fill the thermos and check the installation
The next step is to open the stopcock to fill the thermos. In this way, we can check that there is no water leak and that the installation has been carried out correctly.
5. Purge the circuit
Before being able to use our new electric water heater, it is essential to purge the installation circuit to be able to remove any air that may have entered. To do this, we will have to open the taps one by one.
Finally, it will only be necessary to connect the thermos to a suitable outlet, taking into account the power of the device.
Tips for installing an electric water heater
Finally, we want to offer you a series of tips that could be useful if you finally decide to carry out the installation on your own:
Sometimes you can choose between installing a horizontal or vertical water heater, although vertical water heaters are usually recommended.
It is advisable to leave a space of about 30 or 50 cm between the cover and any obstacle that could prevent proper handling of the device in case maintenance work is necessary.
We also advise you to install the water heater near the consumption points to avoid heat losses. For example, it is common to install the electric water heater in the bathroom or kitchen. If you are going to install it in an outdoor or uninhabited area, insulate the pipes.
Remember to check the pressure and install a temperature limiter or mixer at the water outlet of the electric water heater, to avoid possible burns.