
Quiet-Sizzle Test for Perfect Skillet Steak Heat
Cooking the perfect steak at home can feel intimidating. Many home cooks struggle with getting the temperature just right. Too hot, and your steak burns on the outside while staying raw inside. Too cool, and you end up with a gray, steamed piece of meat instead of a beautiful, caramelized crust. The secret to restaurant-quality results lies in mastering one simple technique: the quiet-sizzle test. This method, perfected by chefs and home cooking enthusiasts at Houston Bamboo House, transforms your kitchen into a steakhouse.
Understanding Cast Iron Heat Distribution
Cast iron skillets have been kitchen staples for generations. They retain heat exceptionally well and distribute it evenly across the cooking surface. However, this same property makes them tricky to work with. Unlike stainless steel or nonstick pans, cast iron takes longer to heat up. Additionally, it stays hot much longer after you turn off the burner.
The key to success when learning how to cook a steak in a cast iron skillet involves understanding this unique heat behavior. Many cooks make the mistake of tossing their steak into a pan that hasn’t reached the proper temperature. Therefore, patience becomes your most valuable ingredient.
What Is the Quiet-Sizzle Test?
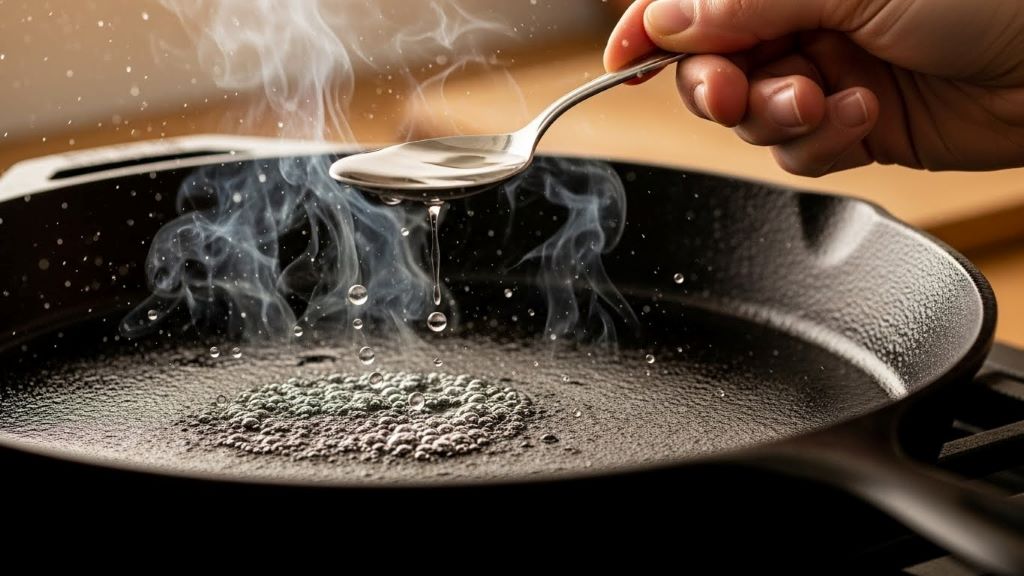
The quiet-sizzle test offers a foolproof way to gauge your skillet’s readiness. Instead of relying on guesswork or infrared thermometers, you use your ears. When your pan reaches the ideal temperature, a small drop of water should create a gentle, steady sizzle. This sound indicates the surface has hit approximately 400-450°F, which is perfect for searing steak.
Conversely, if the water droplet dances wildly across the pan or evaporates instantly, your skillet is too hot. If the water simply sits and bubbles slowly, you need to wait longer. The quiet sizzle falls right in the middle. It sounds like a soft, consistent hiss rather than an aggressive crackle.
Preparing Your Skillet for Steak Success
Before you begin cooking, proper preparation makes all the difference. First, remove your steak from the refrigerator at least 30 minutes before cooking. Cold meat straight from the fridge won’t develop a proper crust. Meanwhile, place your cast iron skillet on the burner over medium-high heat.
Let the pan heat for at least five to seven minutes. This duration ensures even heat distribution across the entire cooking surface. Furthermore, add just a thin layer of high-smoke-point oil, such as avocado or grapeseed oil. According to Serious Eats, oils with smoke points above 400°F work best for high-heat cooking techniques.
Performing the Test Step by Step
Once your pan has heated for several minutes, you’re ready to test. Keep a small bowl of water nearby. Dip your fingers into the water and flick a few droplets onto the skillet surface. Stand back slightly to avoid any splatter.
Listen carefully to the sound the water makes. A quiet, steady sizzle means you’re ready to cook. The droplets should evaporate within two to three seconds. However, they shouldn’t disappear instantly or bounce around like tiny metal balls. If they do, remove the pan from heat for 30 seconds and test again.
Seasoning Your Steak Properly
While your pan heats, prepare your steak with care. Pat the meat completely dry using paper towels. Moisture is the enemy of a good sear. Next, season generously with coarse salt and freshly ground black pepper. Some cooks prefer to add garlic powder or other seasonings at this stage.
Don’t be shy with the salt. A thick steak needs more seasoning than you might think. The salt draws out moisture initially but then gets reabsorbed, enhancing flavor throughout the meat. Additionally, the salt helps create that coveted crispy, caramelized exterior.
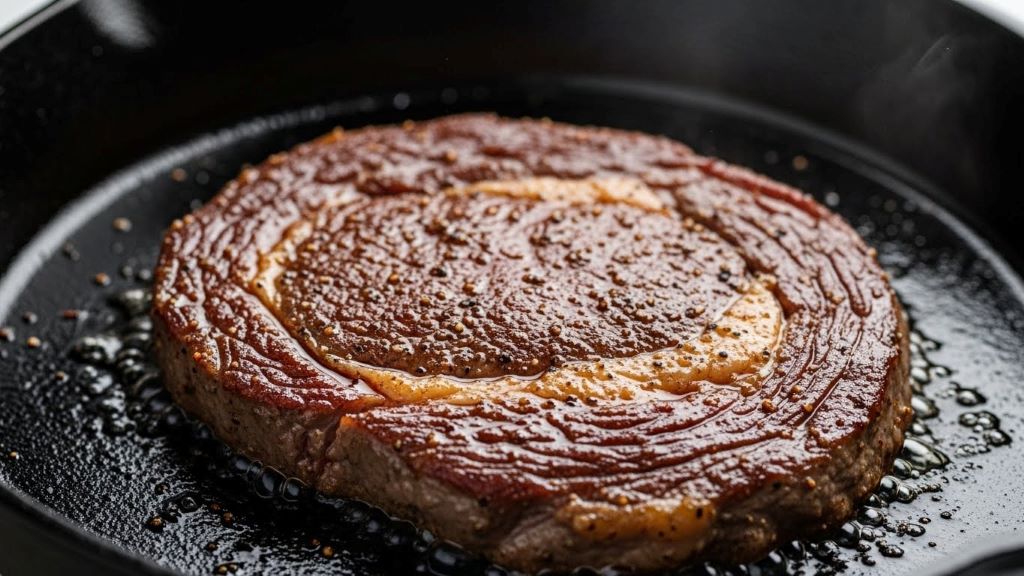
The Perfect Sear Technique
Once your quiet-sizzle test confirms the right temperature, it’s time to cook. Gently lay your steak into the pan, placing it away from your body to prevent oil splatter. You should hear that same steady sizzle when the meat makes contact.
Resist the urge to move or flip the steak immediately. Let it sit undisturbed for three to four minutes. This waiting period allows the Maillard reaction to occur, creating complex flavors and a brown crust. According to research from Cook’s Illustrated, this chemical reaction begins around 285°F and intensifies as temperatures rise.
Flipping and Finishing
After the first side develops a deep brown crust, flip your steak using tongs. Never use a fork, as piercing the meat releases valuable juices. The second side typically needs slightly less time, about two to three minutes for medium-rare.
For thicker cuts, you might need to finish the steak in the oven. Transfer your cast iron skillet directly into a preheated 400°F oven. This method ensures even cooking throughout without burning the exterior. Use a meat thermometer to check for your desired doneness: 130°F for medium-rare, 140°F for medium.
Common Mistakes to Avoid
Even experienced cooks make errors when searing steak. One frequent mistake involves overcrowding the pan. If you’re cooking multiple steaks, leave at least an inch between each piece. Otherwise, the temperature drops, and your meat steams instead of sears.
Another common error is flipping too frequently. You should only flip your steak once during the cooking process. Constant flipping prevents proper crust formation. Moreover, it releases heat each time you lift the meat, extending cooking time unnecessarily.
Resting Your Steak
After removing your steak from the heat, let it rest for five to ten minutes. This step is crucial and often overlooked. During cooking, the meat’s juices move toward the center. Resting allows these juices to redistribute throughout the steak.
Cover the meat loosely with aluminum foil during this period. The internal temperature will continue to rise by about five degrees. Therefore, remove your steak from heat when it’s five degrees below your target temperature. This technique, called carryover cooking, ensures perfect doneness.
Maintaining Your Cast Iron Skillet
Proper care extends your skillet’s life and improves its performance. After cooking, let the pan cool slightly before cleaning. Never plunge a hot cast iron skillet into cold water, as this can cause warping or cracking.
Clean with hot water and a stiff brush. Contrary to popular belief, you can use a small amount of soap if needed. Dry the skillet thoroughly and apply a thin layer of oil to prevent rust. Store in a dry place, and your pan will last for generations.
Experimenting with Different Cuts
The quiet-sizzle test works for various steak cuts. Ribeyes, with their marbling and fat content, create incredible flavor in cast iron. New York strips offer a leaner option with excellent texture. Filet mignon provides buttery tenderness but benefits from butter basting during cooking.
Thinner cuts like flank or skirt steak need higher heat and shorter cooking times. These cuts work wonderfully for quick weeknight meals. Nevertheless, the same temperature testing principle applies. Listen for that quiet sizzle before adding your meat.
Conclusion
Mastering the quiet-sizzle test revolutionizes your steak-cooking abilities. This simple technique removes guesswork and builds confidence in the kitchen. By understanding cast iron’s unique properties and listening for the right sound, you create restaurant-quality steaks at home. Remember to heat your pan properly, season your meat generously, and let it rest after cooking. With practice, you’ll develop an intuitive sense for perfect skillet temperature. Your family and friends will taste the difference in every bite.
Frequently Asked Questions
How long should I preheat my cast iron skillet before cooking steak?
Preheat your cast iron skillet for five to seven minutes over medium-high heat. This duration ensures even heat distribution across the entire cooking surface. Use the quiet-sizzle test with water droplets to confirm the pan has reached the ideal temperature of 400-450°F before adding your steak.
Can I use butter instead of oil for cooking steak in cast iron?
Start with high-smoke-point oil like avocado or grapeseed oil for the initial sear. Butter burns at high temperatures, creating bitter flavors and smoke. However, you can add butter during the last minute of cooking for extra flavor and richness through a technique called butter basting.
Why does my steak stick to the cast iron skillet?
Sticking usually indicates the pan isn’t hot enough or the steak is too moist. Ensure your skillet passes the quiet-sizzle test before cooking. Pat your steak completely dry with paper towels and let it come to room temperature. A properly heated, well-seasoned cast iron skillet should release the steak naturally once a crust forms.
How do I know when my steak is done without cutting into it?
Use an instant-read meat thermometer inserted into the thickest part of the steak. Target 130°F for medium-rare, 140°F for medium, and 150°F for medium-well. Remove the steak five degrees before your target temperature, as it continues cooking during the resting period through carryover heat.
Should I oil the steak or the pan?
Oil the pan rather than the steak. Adding oil directly to the hot skillet creates an even coating across the cooking surface. This method prevents excess oil from dripping and causing flare-ups. Use just enough oil to lightly coat the bottom of the pan with a thin, shimmering layer.
Related Topics: