How to Stop Roof Leaks Around Brackets in Austin, TX
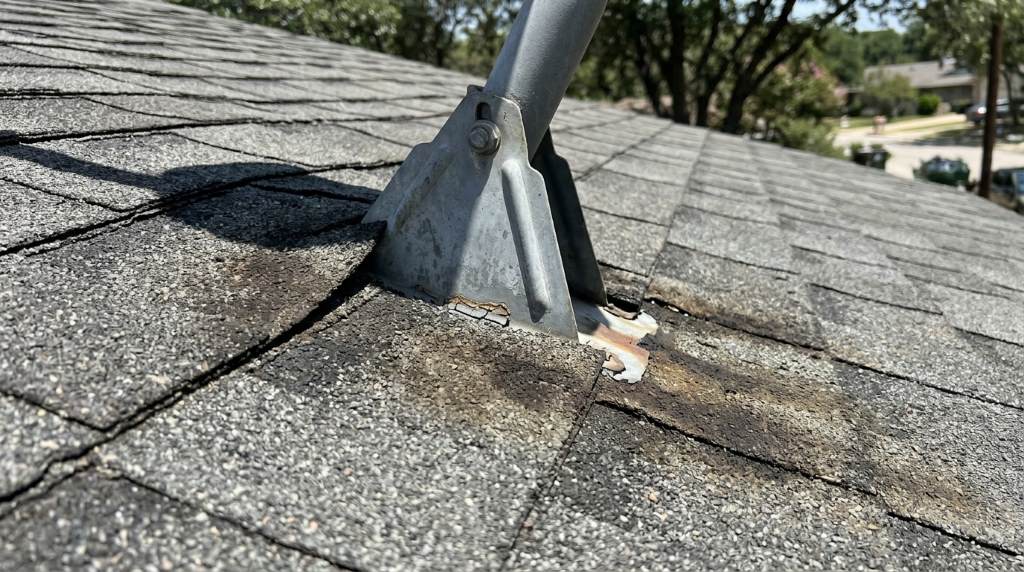
To stop roof leaks around brackets, seal the penetration, replace damaged flashing, and secure the mounting hardware. In Austin, frequent storms and roughly 34 inches of annual rainfall can expose weak roof penetrations quickly. Proper bracket installation also matters when supporting equipment such as a satellite dish roof mount. Therefore, homeowners should repair the water entry point instead of simply covering visible stains.
Key Takeaways
- Inspect brackets, flashing, fasteners, and surrounding shingles before repairing anything.
- Replace cracked flashing instead of relying on surface sealant alone.
- Use compatible roofing sealants around fasteners and bracket penetrations.
- Never ignore attic moisture because small leaks can damage structural materials.
- Check roof drainage because standing water can worsen penetration problems.
- Call a roofing professional when damage extends beneath the roof surface.
Why Roof Brackets Leak in Austin
Roof brackets create necessary openings through roofing materials, but those openings also create potential leak paths. Water can enter around screws, flashing edges, cracked sealant, or poorly fitted mounting plates.
However, Austin weather can make these weaknesses more noticeable. Heavy thunderstorms, strong winds, intense sunlight, and temperature changes repeatedly stress roofing materials.
Over time, ultraviolet exposure can harden sealants around mounting hardware. Meanwhile, wind can loosen fasteners and create tiny gaps beneath flashing.
Some leaks also develop because installers place brackets across unsuitable roofing areas. For example, a mounting point near a drainage channel can collect water during heavy rainfall.
Consequently, homeowners should identify the actual water pathway before applying any repair product. A visible ceiling stain rarely sits directly beneath the entry point.
Before beginning repairs, review practical information about DIY waterproof glue applications. Still, roofing sealants should match the roofing material and exposure conditions.
Common Bracket Leak Locations
Most bracket leaks develop around predictable areas. Finding these locations first can make inspection faster and more accurate.
- Fastener heads: Loose or corroded screws can allow water beneath roofing layers.
- Flashing edges: Bent, cracked, or poorly overlapped flashing can redirect water underneath shingles.
- Mounting plates: Uneven plates can prevent sealants from forming continuous waterproof barriers.
- Sealant joints: Aged sealant can crack, shrink, or separate from metal surfaces.
- Roof penetrations: Unprotected openings can channel water directly toward decking.
Inspect the Bracket and Roof Before Repairing It
Start by examining the bracket from a safe position without disturbing the mounting hardware. Look for cracked sealant, rusted fasteners, lifted shingles, and damaged flashing.
Next, inspect the roofing around the bracket. Search for discoloration, soft decking, granule loss, cracked shingles, or warped materials.
Also inspect the attic directly below the bracket when access allows. Look for damp insulation, dark wood, water marks, or mold-like growth.
However, attic evidence can mislead you because water often travels along rafters before appearing. Trace the moisture path upward toward the roof penetration.
After rainfall, inspect the area carefully from a safe location. Fresh moisture can reveal active entry points more clearly than older stains.
Check the Mounting Hardware
Loose hardware can create movement that repeatedly breaks a roof seal. Therefore, check whether brackets remain firmly attached without applying excessive force.
Do not simply tighten every screw you find. Excessive tightening can crush roofing materials or create new penetration problems.
Instead, identify loose fasteners and inspect their surrounding materials. Replace damaged fasteners with compatible roofing hardware when necessary.
If the bracket supports heavy equipment, avoid removing structural hardware without understanding the mounting system. Improper removal can create larger leaks or equipment hazards.
Repair the Leak Around the Bracket
Once you identify the entry point, clean the repair area thoroughly. Remove loose debris, deteriorated sealant, dirt, and surface contamination.
Next, replace damaged flashing whenever the metal cannot form a reliable waterproof barrier. Sealant should reinforce proper flashing rather than replace badly damaged components.
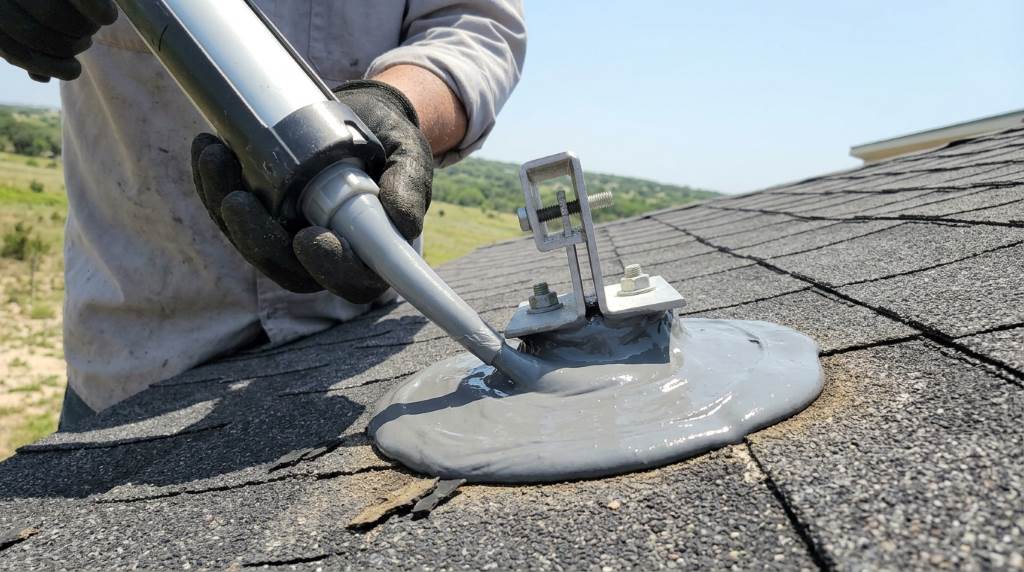
For small fastener leaks, apply a compatible roofing sealant around the penetration. Cover the exposed fastener head and surrounding joint without creating unnecessary buildup.
When shingles surround the bracket, carefully inspect their edges and overlaps. Replace cracked or displaced shingles instead of sealing over visible damage.
Metal roofing requires different repair methods because panels expand and contract with temperature changes. Use products specifically designed for the roof material.
Likewise, membrane roofing needs compatible patches and adhesives. Random sealants can weaken some membranes or create premature adhesion failure.
Use the Right Waterproofing Method
A durable repair depends on compatibility, surface preparation, and proper application. Therefore, choose products according to the roof manufacturer and sealant specifications.
Do not use ordinary household caulk as a permanent roofing repair. Roofing surfaces face weather exposure that household products often cannot withstand.
Apply sealant continuously around vulnerable joints rather than creating isolated patches. Water can enter through even a small unsealed section.
Additionally, keep sealant away from drainage paths that require unrestricted water movement. Blocking drainage can redirect water toward another penetration.
For larger gaps, install appropriate flashing before adding sealant. Sealant alone rarely provides a dependable long-term solution for structural gaps.
Fix Drainage Problems That Make Bracket Leaks Worse
Roof penetrations rarely work alone when persistent water problems exist. Poor drainage can repeatedly expose brackets to standing or slow-moving water.
Check nearby gutters, valleys, drains, and roof slopes for obstructions. Remove leaves and debris without damaging roofing materials or flashing.
Also examine areas where water naturally flows toward the bracket. Redirecting water can reduce pressure on the repaired penetration.
If your roof develops recurring standing water, investigate the underlying slope problem. This guide on a flat roof ponding issue can help explain the drainage concern.
Flat and low-slope roofs require particular attention because water can remain around penetrations. Persistent ponding can accelerate membrane deterioration and sealant failure.
Why Drainage Matters After Repair
A repaired bracket still faces repeated moisture exposure after every storm. Therefore, improving drainage can protect the repair and extend its service life.
Keep gutters clear and verify that downspouts discharge water away from the foundation. Also check whether nearby roof surfaces drain toward vulnerable penetrations.
However, never alter roof slopes without professional guidance. Improper modifications can create structural problems or violate roofing system requirements.
Prevent Future Roof Leaks Around Brackets
Prevention begins before anyone installs equipment on the roof. Choose a mounting location that minimizes unnecessary penetrations and avoids drainage pathways.
Whenever possible, use mounting systems designed specifically for the roofing application. Proper components reduce stress on flashing and minimize sealant dependence.
During routine inspections, examine bracket areas at least twice yearly. Inspect them again after severe storms, especially when strong winds affect the roof.
Watch for cracked sealant, loose hardware, corrosion, lifted shingles, and new water stains. Early repairs usually require fewer materials and less labor.
Keep nearby gutters and drainage systems clear throughout the year. Good drainage reduces the amount of water reaching vulnerable roof penetrations.
Protect Brackets During Roof Maintenance
Roof maintenance can accidentally damage mounting hardware and nearby flashing. Therefore, workers should avoid placing heavy tools directly against brackets.
Likewise, pressure washing can force water beneath shingles and damage delicate seals. Use appropriate cleaning methods for the specific roofing material.
When replacing shingles, coordinate the work around permanent roof-mounted equipment. Improperly repositioned flashing can create new pathways for water.
After maintenance, inspect every disturbed penetration before the next major rainfall. A small inspection can prevent an expensive interior repair later.
When You Should Call an Austin Roofing Professional
Some bracket leaks require more than surface sealing. Professional help becomes important when moisture reaches decking, insulation, framing, or interior finishes.
Call a roofing contractor when you find soft decking around the penetration. Soft wood can indicate prolonged moisture exposure and hidden deterioration.
Professional evaluation also makes sense when leaks continue after repeated repairs. Persistent leakage often indicates damaged flashing, poor installation, or an unseen drainage problem.
Roof-mounted equipment can also create safety concerns during repairs. Professionals can evaluate the roofing system without unnecessarily disturbing critical mounting components.
Additionally, consider professional inspection after major storm damage. High winds can loosen hardware while leaving the roof surface appearing relatively normal.
Signs That Demand Prompt Attention
- Water drips from ceilings during rainfall.
- Attic insulation becomes repeatedly damp.
- Roof decking feels soft or weakened.
- Bracket hardware moves when equipment shifts.
- Flashing shows visible cracks or separation.
- Interior stains continue expanding after repairs.
A Practical Repair Checklist
A structured checklist helps prevent missed problems around roof penetrations. Follow the inspection sequence before purchasing repair materials.
- Identify the bracket and inspect the surrounding roofing.
- Check flashing for cracks, gaps, corrosion, and improper overlaps.
- Inspect fasteners for movement, corrosion, or damaged surrounding materials.
- Check the attic for moisture trails and damaged decking.
- Inspect nearby gutters, valleys, drains, and water flow paths.
- Replace damaged roofing or flashing before applying sealant.
- Apply compatible roofing sealant to appropriate joints and penetrations.
- Inspect the repair after the next significant rainfall.
This process addresses both the immediate leak and the conditions that caused it. Most importantly, it avoids treating the ceiling stain as the primary problem.
How Much Can a Bracket Leak Repair Cost?
Repair costs vary widely because roof access, damage extent, materials, and equipment complexity all influence labor. A simple sealant repair costs far less than replacing damaged decking.
However, homeowners should avoid choosing repairs based solely on the lowest estimate. An inexpensive patch can become costly when water continues entering the roof system.
Ask contractors to explain the leak source, proposed repair, affected materials, and expected service life. Clear explanations make competing estimates easier to compare.
Also request photographs when possible, especially for concealed damage. Visual evidence helps confirm whether the proposed repair addresses the actual penetration.
Conclusion: Stop the Leak at Its Source
Roof leaks around brackets require more than spreading sealant across a visible gap. The reliable approach combines careful inspection, proper flashing, compatible sealants, secure hardware, and effective drainage.
Because Austin storms can quickly test weak roof penetrations, timely repairs matter. Inspect your bracket after severe weather and address small defects before they become structural problems.
If you cannot identify the leak source or discover damaged decking, contact a qualified Austin roofing professional. Schedule an inspection before the next major storm and protect your roof from recurring water damage.
Frequently Asked Questions
Can I seal a leaking roof bracket myself?
Yes, homeowners can handle minor surface leaks when they can safely access the area and identify the penetration.
Why does my roof leak around screws?
Roof screws can leak when seals deteriorate, fasteners loosen, or surrounding roofing materials become damaged.
Should I replace flashing around a roof bracket?
Yes, replace damaged or improperly installed flashing when it cannot create a dependable waterproof barrier.
Can roof sealant permanently fix a bracket leak?
Sealant can provide a durable repair when the underlying flashing and roofing materials remain structurally sound.
When should I hire a roofing contractor?
Hire a professional when leaks persist, decking feels soft, damage appears extensive, or roof access creates safety risks.