The Ultimate Guide to Elevated Deck Systems
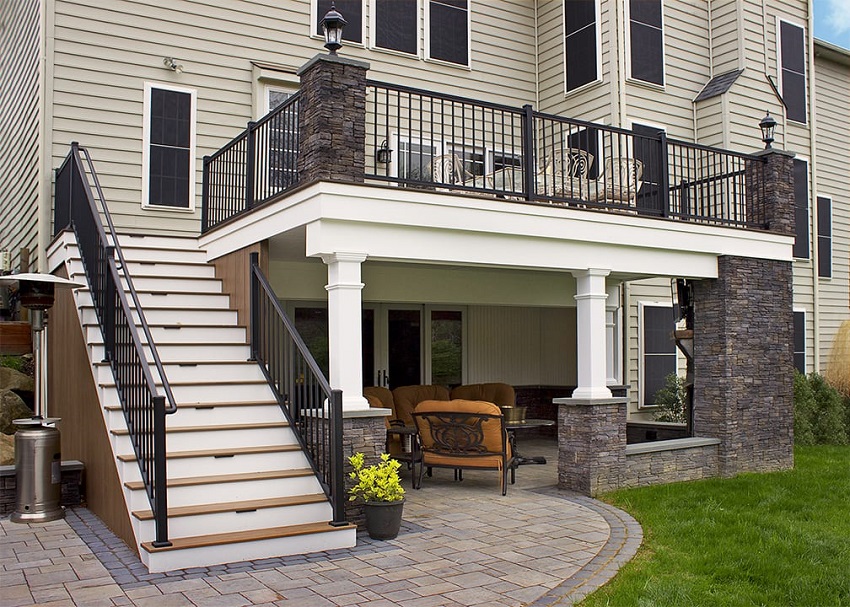
A well-constructed elevated deck system can add a great deal of visual appeal to your outdoor space. The design of this structure gives you a place to sit or relax without having to worry about stopping or tripping. The following article will explain installing pedestals, building a pier and footings, and selecting the right wood plank and fire pit. Getting started is easy and can even be done in one weekend.
Installing pedestals
When installing pedestals for elevated deck systems, follow the manufacturer’s guidelines for the Level.IT adjustable deck supports. Pedestals must be installed in a grid layout. Space them at least 250 to 350mm apart, depending on the design. Then, level the base of each pedestal. Using a laser leveling device, measure the distance between the two points and mark the height of each pedestal. Mark the locations of each pedestal to ensure a level surface.
Be sure to install a sloped substrate for a proper pedestal system. The slope of the base should be about 1/4 inch per foot. The base slope should not exceed this amount, or the pedestal head may not stay stable. Bracing the base and installing guy wires are recommended if the slope is higher than that. The head of the pedestal system includes spacer tabs to keep pavers separated. These are usually included with the pedestal head or may need to be purchased separately.
Building a pier and footings
When building a pier for an elevated deck, it’s essential to know the size and strength of the soil underneath. This is because most piers are round, not square, and the area of a circle is approximately three times the area of a square. This means you’ll need to build the footings with a diameter at least two times as wide as the pier’s diameter.
Before you pour the concrete, you’ll need to choose the post base for your elevated deck. First, make sure you have the appropriate height for the anchor bolts, as different materials have different heights. If you’re planning to use metal post bases, you’ll need to check the specifications of each one. For footings, choose a type that’s at least four inches tall.
Choosing a wood plank
When choosing a wood plank for your elevated deck, several factors need to be considered. One of the most important factors is the durability of the material. Ipe wood is very durable and has a high fire rating, and it is also extremely dense and resistant to the elements. Unfortunately, Ipe also tends to be more expensive than other woods. However, increased durability and low maintenance are more than compensated for.
Another factor to consider when choosing a wood plank for elevated deck systems is its color. Some wood planks may fade in color over time. If you plan to use the wood plank in your elevated deck for a long time, you’ll want to choose a similar color to the surrounding area. Wood is one of the most popular materials for elevated decks, and you’ll want to select a color that matches the rest of your home.
Choosing a fire pit
Choosing a fire pit on an elevated deck system requires some careful considerations. While a 3-foot diameter fire pit is fine for an outdoor patio, it may not provide much seating room. Typically, a 16-inch diameter fire pit is more suitable. Keep in mind that local regulations may apply to fire pits. Also, check with your insurance company to determine any rules. Ultimately, you will want to have a fire pit that is safe and attractive on your elevated deck system.
Using a wood-burning fire pit may not be the best option for an elevated deck system. Wood or gas fire pits put off a large amount of heat and could melt decking or siding. When selecting fuel, make sure that it is seasoned. Never use construction waste as fuel, as it could be dangerous for the surrounding area. You should also consider using a spark screen to reduce airborne embers. Finally, never use gasoline or lighter fluid because they are highly flammable and can spread rapidly.
Installing a rim joist
Follow the steps outlined below to install a rim joist for elevated-deck systems. First, mark the location of the middle post and the side of the beam to which it will fall. Next, attach the middle joist to the shaft by installing the first screw close to the top of the middle joist. After securing the middle joist to the beam, loosen the top screw and reposition the rim joist until plumb.
Next, install the rim joist and ledger. You can also install the rim joist from the basement or crawlspace. Next, you should remove the siding on the area where you will attach the log and cut away the house wrap. Next, install self-adhesive flashing on the exposed sheathing, and tuck it under the house wrap. Finally, install the ledger according to the installation drawings and use the appropriate fasteners.
Choosing a waterproofing system
When choosing a waterproofing system for your elevated deck, there are a few essential considerations. In particular, you should consider the climate of your deck, as certain conditions can cause your deck to require a stricter coating than others. You also want to choose a system that will resist the elements for years without extensive maintenance.
The membrane used in a waterproofing system is usually made from two types of materials: modified bituminous rubberized asphalt (MBT) or composite thermoplastic. Cold liquid-applied polyurethanes are fully bonded to the surface, while a composite thermoplastic membrane has a core of active polymer. The difference between the two is in their thickness. As a result, an asphalt-modified waterproofing system has a more excellent overall resistance to water vapor than other systems.