How to Correct Your Golf Hand Position for More Accurate Shots
Your hands are the only connection between you and the golf club. In 2026, golfers are realizing that even small adjustments in hand position can transform their game. A proper grip sets the stage for every shot, yet it’s often the most overlooked aspect of the swing.
Research shows that 80% of amateur golfers struggle with inconsistent shots due to improper hand placement. This issue can be effectively addressed with a golf hand position trainer. Additionally, PGA coaches agree that hand alignment accounts for 60% of all swing inconsistencies in players.
Furthermore, using a grip form correction tool helps build the muscle memory needed for consistent, accurate shots. The right hand alignment tool ensures your hands work together as a cohesive unit.
Why Hand Position Matters in Golf
Many golfers focus on stance, posture, or swing speed while neglecting their hand position. However, a flawed grip leads to slices, hooks, and inconsistent ball striking. A swing posture aid addresses these issues by guiding your hands into the correct position.
Moreover, data from the Titleist Performance Institute reveals that proper hand alignment improves shot accuracy by 40%. When your hands are positioned correctly, the clubface naturally squares at impact. This consistency results in better distance control and fewer mishits.
Additionally, a hand alignment tool prevents bad habits from forming. Many golfers unknowingly adopt a grip that’s too strong or too weak, which becomes harder to correct over time. Starting with the right tool ensures you build proper mechanics from the beginning. When practicing these fundamentals, you can also use portable golf practice mats, which allow you to train anywhere with a realistic surface while reinforcing correct swing and grip habits.
Key Features to Look For
When selecting a golf hand position trainer, consider these essential features:
- Ergonomic Design: The trainer should fit comfortably in your hands, mimicking a real club’s feel.
- Adjustability: Look for models that accommodate different hand sizes and grip styles.
- Visual Guides: Some tools include color-coded or textured markers to indicate proper hand placement.
- Durability: Choose materials that withstand repeated use without wearing out.
- Portability: A compact, lightweight design allows you to practice anywhere.

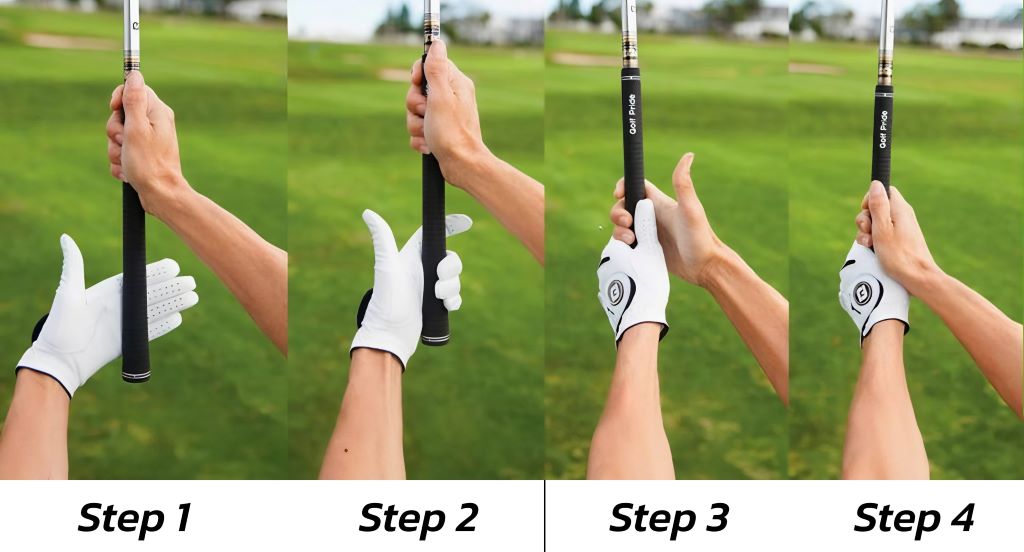
Step-by-Step Guide to Correcting Hand Position
Step 1: Understand Proper Grip Basics
Familiarize yourself with the three primary grip styles: overlapping, interlocking, and ten-finger. Each has its benefits, but the overlapping grip is the most widely used among professionals.
Step 2: Position Your Lead Hand
Place the grip form correction tool in your lead hand, ensuring the club rests diagonally across the base of your fingers. Your thumb should point slightly right of center for right-handed golfers.
Step 3: Align Your Trail Hand
Wrap your trail hand around the tool, ensuring the V formed by your thumb and forefinger points toward your trail shoulder. The hand alignment tool will help you achieve the correct positioning.
Step 4: Check for Neutral Alignment
Use the tool to verify that both hands are working together. A neutral grip ensures the clubface remains square through impact, reducing the likelihood of slices or hooks.
Step 5: Adjust Pressure
Avoid gripping too tightly. The golf hand position trainer should feel secure but not strained. Light, even pressure promotes better club control and swing speed.
Step 6: Practice with Feedback
Use the tool’s visual or tactile cues to reinforce proper alignment. Many hand alignment tools provide instant feedback, allowing you to make real-time adjustments.
Step 7: Transition to Real Clubs
Once comfortable, apply the same hand position to your actual clubs. The muscle memory developed with the swing posture aid will help you maintain proper alignment.
Step 8: Monitor Your Progress
Record your swings or use a mirror to check your hand position. Compare your grip to professional examples to track improvements.
Step 9: Combine with Other Drills
Pair hand position practice with stance and posture drills. A holistic approach ensures all aspects of your swing are working in harmony.
Step 10: Seek Professional Guidance
Consider working with a golf instructor. They can provide personalized feedback to refine your grip and overall technique.
Common Hand Position Mistakes and Fixes
- Strong Grip: Rotating both hands too far to the right causes hooks. Use the hand alignment tool to neutralize your grip.
- Weak Grip: Hands turned too far left leads to slices. The grip form correction tool helps you find the ideal middle ground.
- Misaligned Hands: Inconsistent hand placement results in erratic shots. The swing posture aid ensures both hands work as a unit.
- Gripping with Palms: The club should rest in your fingers, not your palms. The tool’s design encourages proper finger placement.
- Tension in Hands: A tight grip reduces swing speed and control. Practice with the tool to develop a relaxed, consistent grip.
Benefits of Using a Golf Hand Position Trainer
A grip form correction tool offers several advantages beyond just fixing your hand position. It builds confidence by providing immediate feedback, so you know you’re practicing correctly. This confidence translates to better performance on the course.
Additionally, the hand alignment tool helps you develop a repeatable swing. Consistency is key in golf, and proper hand positioning ensures your hands return to the same position every time. This repeatability leads to more accurate shots and lower scores.
Furthermore, using a swing posture aid can prevent injuries. A poor grip forces you to compensate with your wrists, shoulders, or back, leading to strain. Proper hand alignment promotes a natural, fluid swing that reduces stress on your body.
FAQs About Golf Hand Position Trainers
How long does it take to see improvement with a golf hand position trainer?
Most golfers notice better hand alignment within 2-3 weeks of regular practice. Full integration into your swing may take 1-2 months, depending on practice frequency.
Can I use a golf hand position trainer for all clubs?
Yes, the same hand position principles apply to all clubs. However, you may need to adjust slightly for drivers or putters, which have unique grip requirements.
What’s the difference between a strong and weak grip?
A strong grip has both hands rotated too far to the right, often causing hooks. A weak grip has hands turned too far left, typically leading to slices. A neutral grip, achieved with a hand alignment tool, balances these extremes.
Do I need a separate trainer for left-handed golfers?
Some hand position trainers are ambidextrous, while others are designed specifically for left or right-handed players. Always check the product specifications before purchasing.
Can a golf hand position trainer fix my slice?
A slice often results from a weak grip or open clubface. A golf hand position trainer helps correct grip issues, which can reduce or eliminate slicing. However, swing path and posture also contribute to slices.
Conclusion
Correcting your golf hand position is one of the fastest ways to improve your accuracy. By focusing on proper alignment and using a golf hand position trainer, you’ll build a solid foundation for consistent, accurate shots. The right grip form correction tool can save you years of frustration and help you enjoy golf to its fullest.
Ready to perfect your grip? Invest in a quality golf hand position trainer and start practicing today. Your scores will reflect the effort.
Featured Image Source